Stop one person from claiming a once-per-customer reward through many accounts.
Signup farms exist for one payoff: the reward. The same person spins up fresh accounts to claim a signup bonus, burn through a coupon code, or restart a free trial. The catch happens not when the account is born but when it reaches for the reward, so this tutorial lives at the redemption endpoint. Joining accounts at registration is a separate job the signup tutorial covers. Wire that up for the create-account moment and treat this page as the reward-time gate on top of it.
Promo abuse is when one person creates many accounts to claim a reward that is meant once per customer: a signup bonus, a first-order coupon, referral credit or a free trial reset. The accounts look like different customers, but they trace back to the same person behind one machine or one network.
ShieldLabs ties every redemption to the account behind it and to everything that account is linked to. Pass the account’s hashed User HID and ShieldLabs links it to the devices, visitors and public and local IPs it uses. The Device ID holds through cleared cookies, incognito mode and IP changes, so ten “new” customers on one machine resolve to one Device ID with ten linked accounts. ShieldLabs detects Multi-accounting on your users directly, at Medium or High confidence, and makes it available in the analytics dashboard, the API and webhooks. Underneath, each redemption is one identification: a Risk Score from 0 to 100 with every risk signal named and weighted, so a VPN, proxy, Tor, browser automation or an anti-detect browser on the redemption shows up by name.ShieldLabs answers four questions at each redemption, and you choose the action for each case:
Layer
What it answers
Where you read it
Latency
Account
”Is this account risky, and which devices and IPs is it linked to?”
History API by user_hid: the account’s worst band, its Device IDs and IPs
On demand
High-Risk Events
”Is this account multi-accounting?”
Multi-accounting on the user, at Medium or High confidence, in the analytics dashboard, the API and webhooks
When detected
Device
”How many accounts already claimed from this device, even after cleared cookies, incognito or a new IP?”
History API by device_id: the distinct accounts behind it
On demand
Identification
”Is this redemption masked or automated right now?”
risk_score, the named signals and detection_flags on the webhook
About 300 ms
The signup and redemption stages answer two different questions, and you want both. Score at signup to thin the farm early (the patient farm creates accounts slowly, each clean on its own), then check again at redemption: ten “different” customers redeeming the same coupon from one machine is a shape no single clean signup ever shows.
The policy, wired up in “Build it” below: read the account (its worst band and linked devices), the redemption’s risk_score and named signals, and the number of distinct accounts already behind the Device ID and the Local IP. Grant when the account and the redemption are clean and the device is fresh. Require verification when the redemption carries strong risk signals, when the device already carries more accounts than your per-customer cap allows, or when the account has a Multi-accounting event, whether it reached you through the API or webhooks or you reviewed it in the analytics dashboard. The outcome: a farm clearing cookies and rotating VPN exits between accounts collapses to one Device ID and often one Local IP, so the reward holds for review before it is granted, while a genuine first-time customer passes. ShieldLabs stops promo abuse by linking the accounts and scoring each redemption.
Start Free with 5,000 identifications, one time, no credit card, or log in. In the analytics dashboard, add the domain you want to protect under Integration > Domains, then open Integration > API keys and copy its keys with the copy button next to each. The Public Key loads the snippet in the browser. Keep the server credentials on your backend: the Private API Key reads the History API, and each webhook endpoint has its own whsec_… signing secret. See API keys and Integration.
2
Wire the signup gate first
Join accounts to the Device ID at registration with the signup tutorial, so the farm is already thinned before it reaches the reward.
3
Identify the redemption
Add the snippet to the page where the reward is claimed (the cart with the coupon applied, the “start trial” screen, the bonus-claim button). Pass a hashed User HID with checkAuthenticatedUser on every signed-in page. Users, account-level risk and all four High-Risk Events are built on it. Within one visit (while a page of your site stays open in the browser, across route changes in a single-page app and across open tabs), checkAnonymous and checkAuthenticatedUser run at most one identification every five minutes for the same user. A call inside that window posts nothing, counts nothing, and its onInitialized handler receives { status: "not_initialized" }. On a multi-page site, a full page load in the only open tab can start a new visit with its own identification. So for the redemption itself, call forceCheckAuthenticatedUser when the user starts filling the redemption form (its first focus): it runs an identification every time, keeps the current Session ID and restarts the five-minute window, so the redemption always posts its own request ID (see Identify signed-in users). onInitialized fires when the check starts, before the snippet has sent the identification, so do not navigate away inside it: store the request ID and let the form submit normally. Pass the account’s hashed id, never a raw email.
redeem.html
<script type="module"> const mod = await import( 'https://cdn.shieldlabs.ai/snippet.js?publicKey=YOUR_PUBLIC_KEY' ); const form = document.getElementById('redeem-form'); // An identification for this redemption, even inside the five-minute window, // started when the form comes into use. onInitialized fires when the check // starts, before the snippet sends it, so it only stores the request ID and // the form submits normally. With no request ID, your backend treats the // redemption as unverified. Pass the hashed account id, never a raw email. const identify = () => { mod.forceCheckAuthenticatedUser('8a9f-hashed-account-id', { onInitialized: (result) => { if (result.status === 'initialized') { document.getElementById('shieldlabs-request-id').value = result.requestID; } }, }); }; if (form.contains(document.activeElement)) identify(); // already focused (autofocus) else form.addEventListener('focusin', identify, { once: true });</script><form id="redeem-form" method="POST" action="/api/redeem"> <input type="hidden" id="shieldlabs-request-id" name="shieldlabsRequestId" /> <input type="text" name="couponCode" placeholder="Coupon code" /> <button type="submit">Apply reward</button></form>
4
Read the Risk Score, gate on risk signals
The Risk Score arrives on the webhook. Verify the X-Shield-Signature HMAC, then cache it by request_id. Your endpoint reads it back with the shared waitForScore helper from the Use Case Tutorials, which falls back to a History API read by request_id and returns null when there is no identification. A missing identification is unverified, never clean. Hold a redemption with strong risk signals here, then carry on to the account and the device in the next steps.
api/redeem.js
import { app, waitForScore, band, accountView, accountsBehindDevice, NIL_DEVICE } from '../shieldlabs-helpers.js';app.post('/api/redeem', async (req, res) => { const { couponCode, shieldlabsRequestId } = req.body; const accountId = req.user.id; const userHid = req.user.hashedId; // the hashed id you pass to the snippet // 1. Your normal redemption checks first (code valid, not already used by // this account, within campaign window). if (!(await couponIsRedeemable(couponCode, accountId))) { return res.status(409).json({ error: 'Coupon not redeemable' }); } // 2. The guard: read this redemption's identification (webhook cache, then // History fallback). No identification is unverified, never clean. const risk = await waitForScore(shieldlabsRequestId, 2000); if (!risk) { return res.status(200).json({ requireVerification: true, reason: 'no_identification' }); } if (risk.user_hid !== userHid) { return res.status(200).json({ requireVerification: true, reason: 'identification_mismatch' }); } if (risk.risk_score > 100) { // The 999 rate-limit marker. return res.status(200).json({ requireVerification: true, reason: 'rate_limit_marker' }); } const flags = risk.detection_flags ?? {}; const signals = risk.signals ?? []; // null on the History fallback; log them with your decision // 3. Use detection_flags to tell which signal fired: a 30 from one signal is // not a 30 from another. Dangerous, or automated: hold before granting. const automated = flags.browser_automation || flags.javascript_disabled; if (band(risk.risk_score) === 'Dangerous' || automated) { return res.status(200).json({ requireVerification: true, reason: 'risk_signals' }); } // VPN, proxy or datacenter alone is common for real customers: weigh it // against the account and the device in the next steps. const masked = flags.vpn || flags.proxy || flags.privacy_relay || flags.browser_vpn_proxy || flags.datacenter_ip; return grantOrGate(req, res, risk, userHid, masked);});
Read a high Risk Score together with its named risk signals and the user’s history. A real customer on a corporate VPN can reach the Suspicious band; the signals show why, and you choose the action for each case. Branch on the band, on the signals[].name slugs or on the named detection_flags, never on a label string.
5
Read the account behind the redemption
The redemption is one identification. The account behind it has a history. The shared accountView helper reads the account’s earlier identifications from the History API by user_hid: the worst band across them shows how risky the account has been, and its distinct Device IDs and public IPs are the devices and networks it is linked to. When a Multi-accounting event arrives for the account through the API or webhooks, or when you review it in the analytics dashboard, record it against the account in your own system with its confidence, and this step reads that record.
Read the account
// Returns why the reward should wait, or null when the account looks clean.async function accountHold(userHid, risk) { // Accounts with a Multi-accounting event, recorded in your own store when it // arrives through the API or webhooks or when you review it in the analytics // dashboard: null, 'medium' or 'high' (its confidence). const marked = await markedAccounts.get(userHid); if (marked === 'high') return 'deny'; if (marked) return 'marked_account'; // The account's earlier identifications (newest 100), without this one. const account = await accountView(userHid, { excludeRequestId: risk.request_id }); if (account.worstBand === 'Dangerous') return 'dangerous_history'; if (account.devices.size >= YOUR_DEVICE_LIMIT) return 'many_devices'; return null;}
An account whose worst band is Dangerous, or one linked to more devices than a real customer uses, goes to verification before the reward.In the analytics dashboard, the account’s card shows the same view: its band for the selected period, its High-Risk Events, each pill coloured by its confidence, and each linked device, visitor and IP with the band of the identifications it shares with the account. User, device, visitor and IP cards describes each part.
A user in the analytics dashboard: the worst band of its identifications and a High-Risk Event (red pill: High confidence).
6
Count the accounts behind the device
The Risk Score tells you whether this one redemption looks masked. The number of accounts behind the device is a separate count, and that count gives the farm away. ShieldLabs detects the farm directly as the Multi-accountingHigh-Risk Event: several accounts run by one person, linked through the devices and network they share, the classic bonus-farm shape. Each detection carries Medium or High confidence, depending on the combination of evidence, on its own axis next to the Risk Score, so an account can be Trusted on every identification and still be multi-accounting. It needs the hashed User HID, so keep passing it as in the steps above.High-Risk Events are available in the analytics dashboard, the API and webhooks, and the previous step acts on the account when one arrives. At the redemption itself, the Risk Score and risk signals of the identification remain the input, together with a live count: read the History API by device_id and count distinct accounts. Count accounts per local_ip.ip in your own store from the webhook, since the History API has no Local IP search. local_ip is the Local IP: the address the browser itself reports, which can differ from the public IP behind a VPN or proxy.
async function grantOrGate(req, res, risk, userHid, masked) { // 1. The account behind the redemption (previous step). // A failed History read is unverified: the reward waits for verification. const hold = await accountHold(userHid, risk).catch(() => 'history_unavailable'); if (hold === 'deny') { return res.status(403).json({ error: 'reward_denied', reason: 'held_for_review' }); } if (hold) { return res.status(200).json({ requireVerification: true, reason: hold }); } // 2. An all-zero Device ID means no usable device signals reached ShieldLabs: // there is no device to count accounts on, so the redemption is unverified. if (risk.device_id === NIL_DEVICE) { return res.status(200).json({ requireVerification: true, reason: 'no_device' }); } // 3. Distinct accounts already seen on this device ("anonymous" is not an // account). YOUR_ACCOUNT_LIMIT is your per-customer policy. A masked // redemption on a device that already carries another account also waits. const accountsOnDevice = await accountsBehindDevice(risk.device_id).catch(() => null); if (accountsOnDevice === null) { return res.status(200).json({ requireVerification: true, reason: 'history_unavailable' }); } if (accountsOnDevice >= YOUR_ACCOUNT_LIMIT || (masked && accountsOnDevice > 1)) { return res.status(200).json({ requireVerification: true, reason: 'reward_already_claimed_on_device' }); } // 4. Clear: grant the reward. return grantReward(req, res);}
History API reads never count against your included identifications. For high-volume flows, keep your own counters (redemptions per Device ID and per local_ip.ip from the webhook) as the fast path, and reserve live History reads for the rewards that are expensive to give away by mistake. The History API searches by public IP (ip) and has no Local IP search, so the Local IP count always comes from your own store.
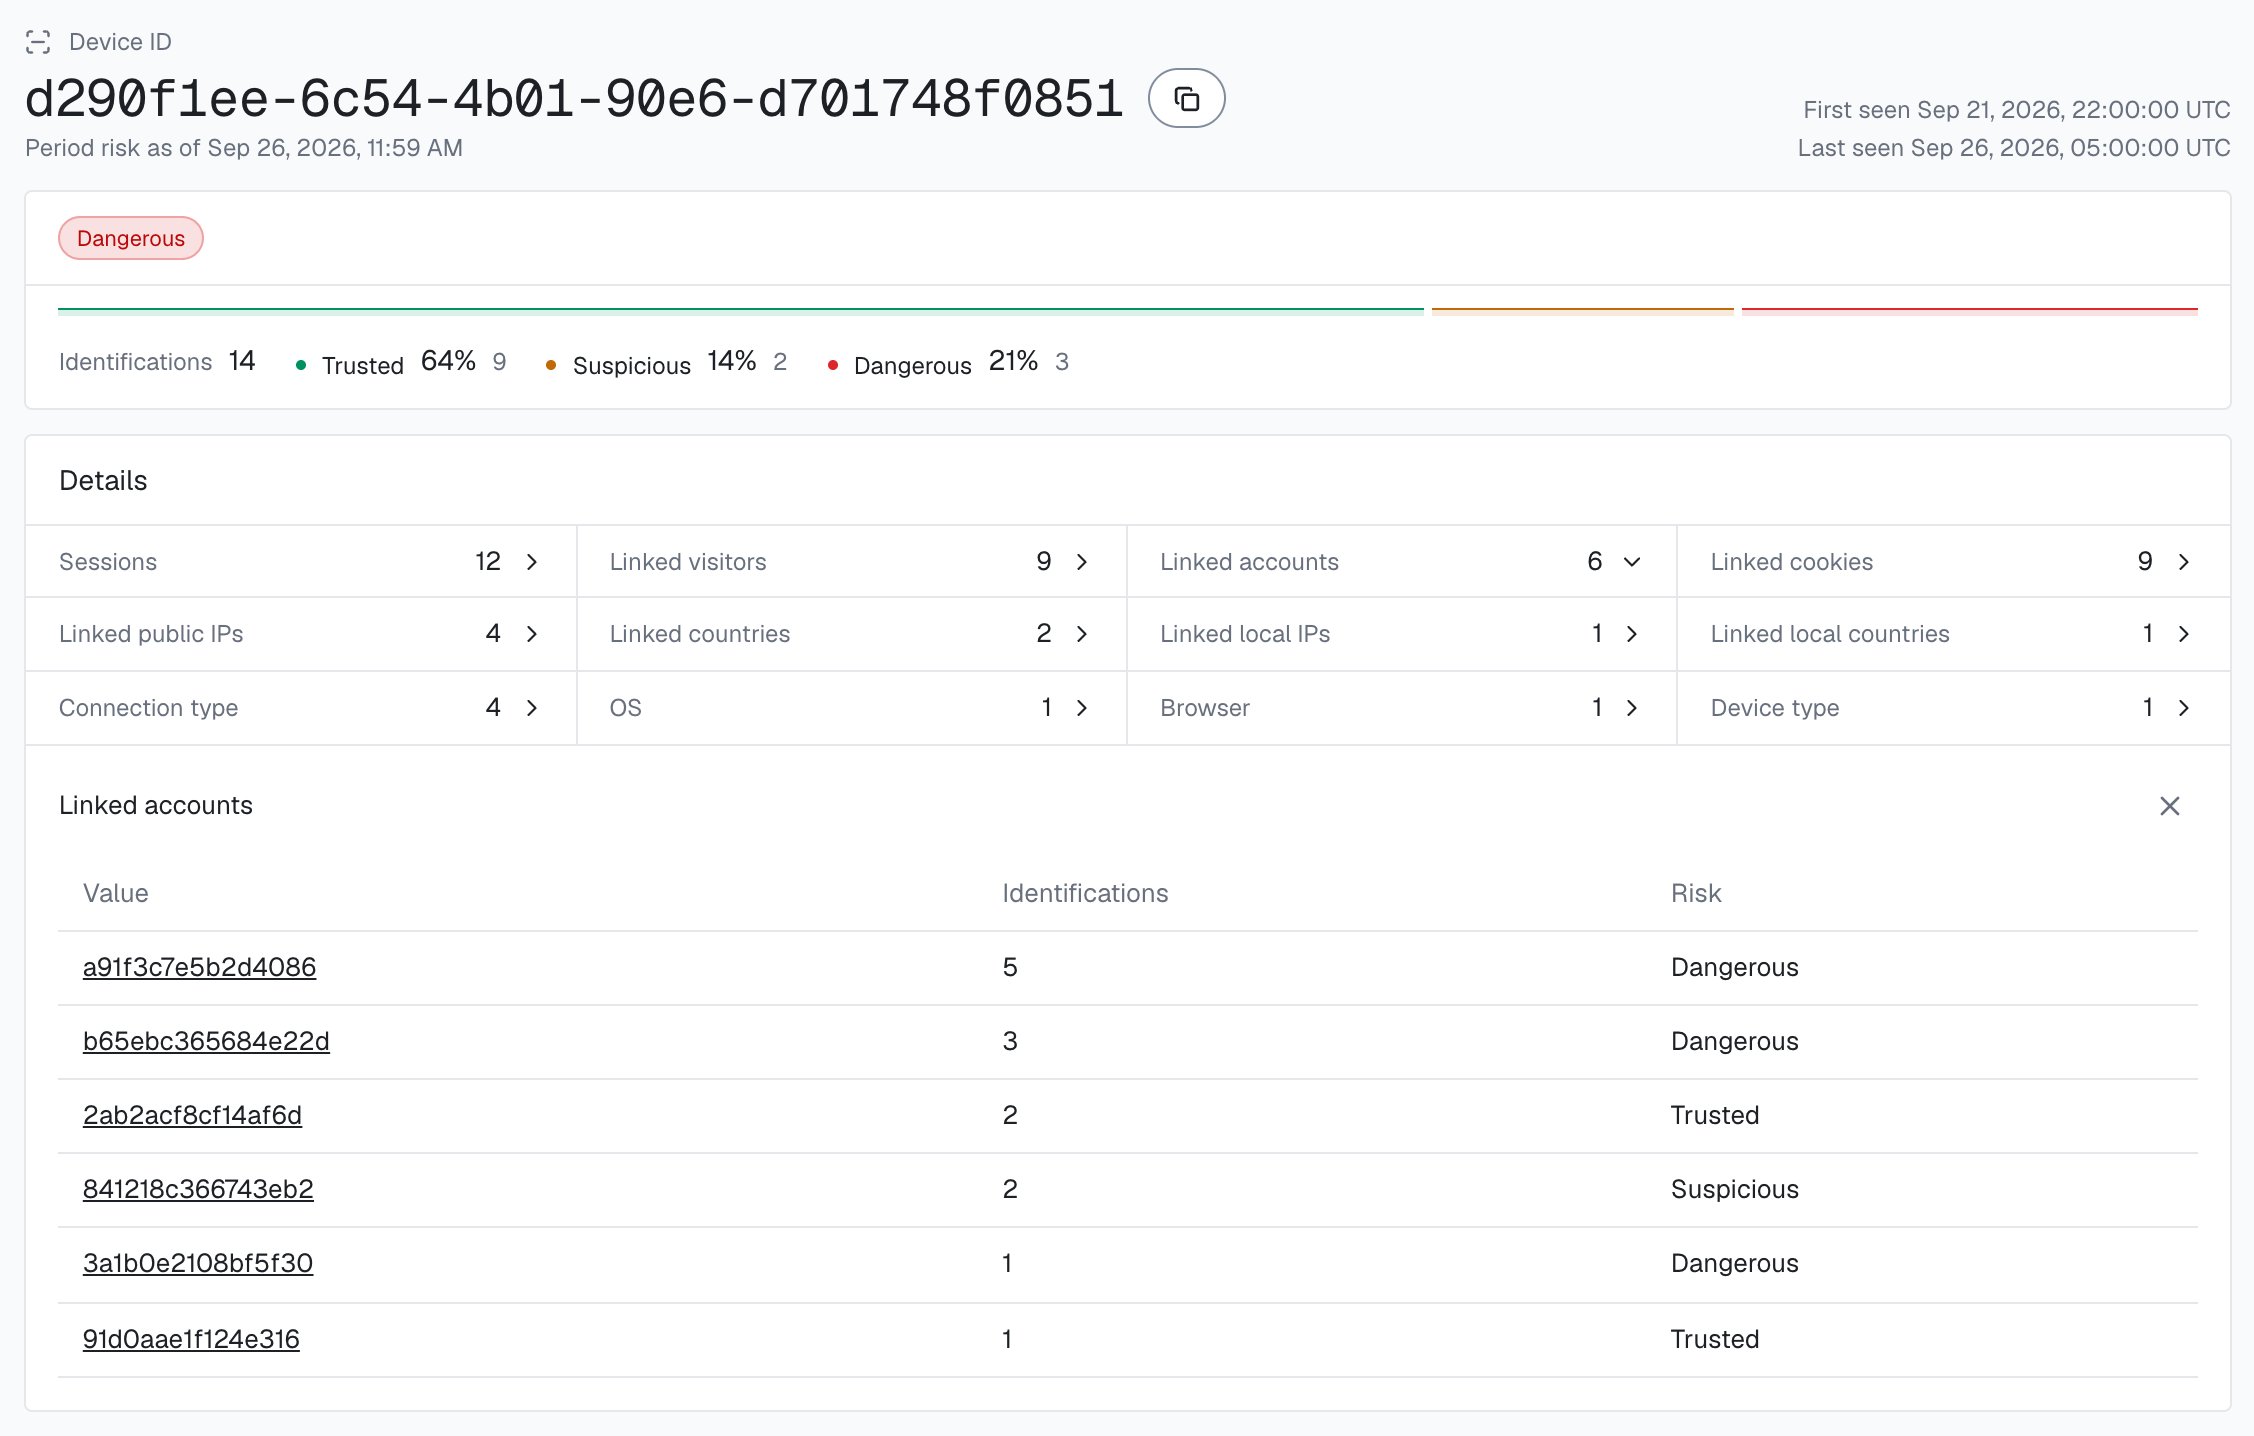
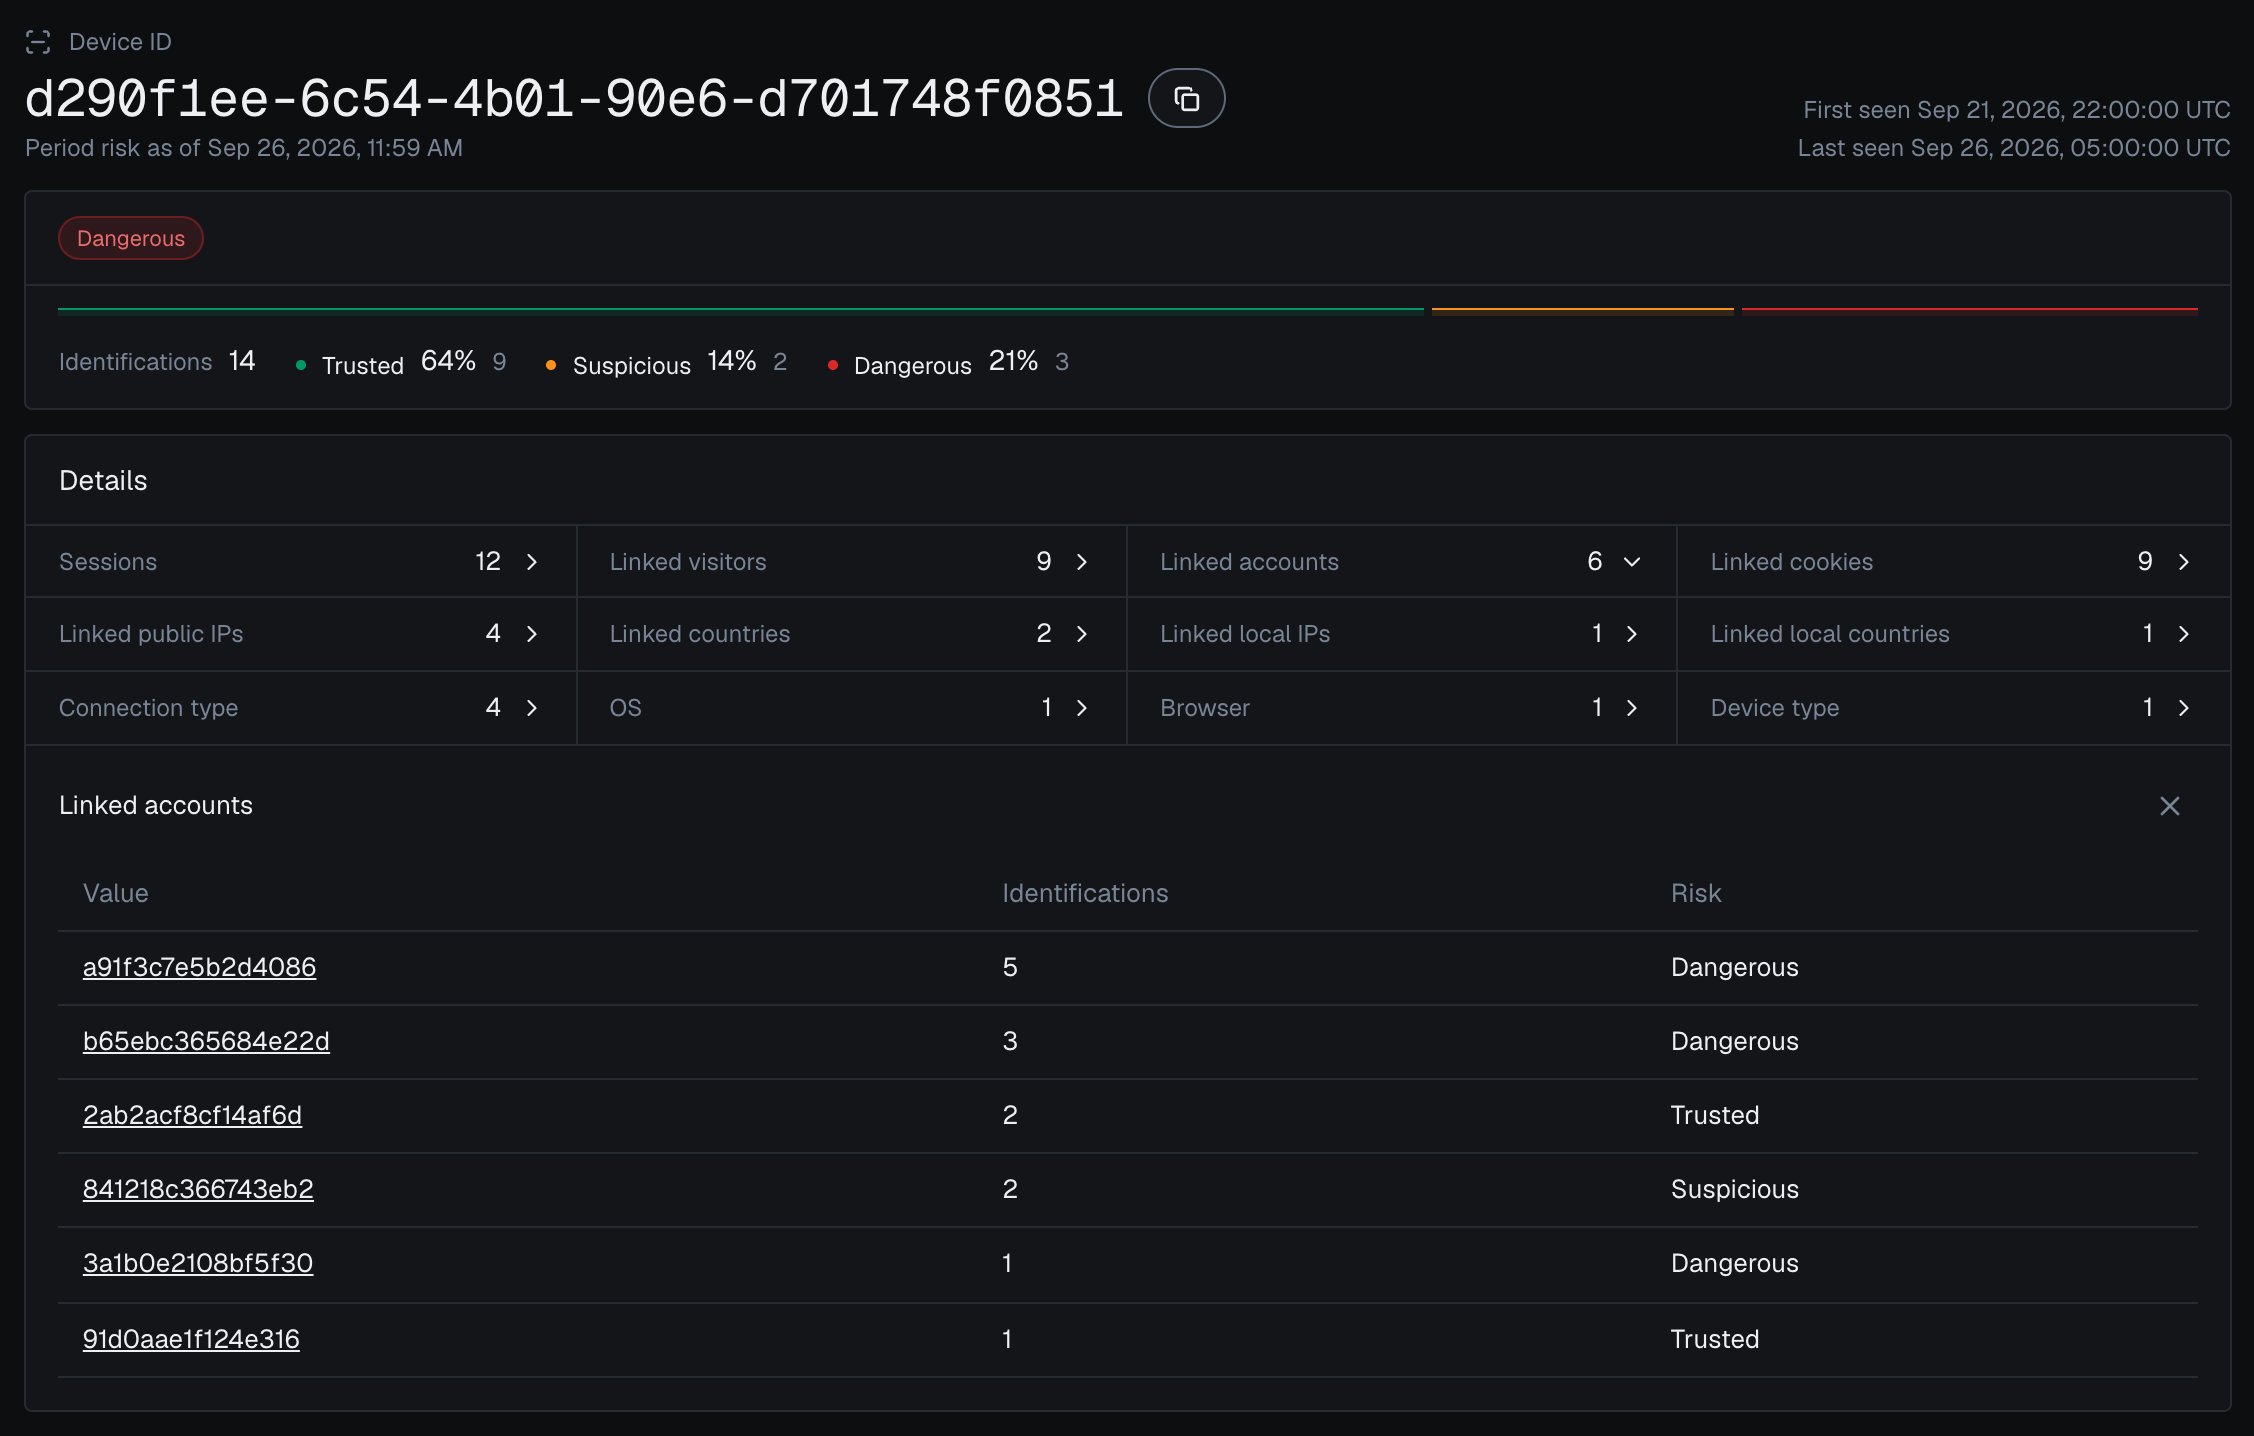
A person using several separate browsers shows up as several devices: another browser is another Device ID. A count on local_ip.ip from your own webhook store closes that gap: ten accounts claiming through one Local IP is a strong shape even when each reports a different device, and the Multi-accounting event links accounts through the network they share. Weigh both alongside your own per-code or per-campaign redemption caps.The analytics dashboard shows the same count: open a Device ID from Analytics, and Linked accounts lists every account seen on it, each with the band of its identifications on that device.
One Device ID in the analytics dashboard, with every account linked to it.
7
Decide and tune
Grant, verify or deny in your backend, per the policy table below. Start in logging-only mode, watch how real redemptions distribute, then raise friction where the data justifies it.
You do not need a real farm to see this work. Claim the reward once in your normal browser and note the device_id on the webhook. Then play the farm: clear cookies or open a private window, and redeem again as a different account. The cookie_id and visitor_id change each time, but the same device_id returns, and the distinct-account count on that device climbs with each run, which is exactly the count your handler gates on. A second browser gets its own Device ID, which the Local IP count covers. Switching networks or toggling a VPN adds the matching risk signals to the redemption without changing the Device ID.Then search Analytics in the analytics dashboard for that Device ID and open it: Linked accounts lists every account you used in the test, each with the band of its identifications on that device.
The three bands are defined in Risk Scoring, and the per-band playbook lives in Acting on results. Mapped to a reward gate, with the account and the device count layered on top: