Check the buyer’s account, device and payment moment before you charge, and step up or hold risky orders.
The payment step is where risk matters most: a masked or automated session at checkout is a stronger signal than the same session browsing a catalog. This tutorial reads the buyer’s account and a freshRisk Score (0-100) right before the charge and maps the Risk Score to its band, so you can choose the action for each case.
Payment fraud at checkout is the use of stolen cards, stolen accounts, or coordinated fake identities to push a charge through the payment step before it can be caught. The tell is concealment: the buyer hides behind a VPN, proxy, Tor, a datacenter IP, an anti-detect browser or an automated browser so the session cannot be traced back to a single person or device.
ShieldLabs ties each checkout to the buyer’s account and to everything that account is linked to. Pass the account’s hashed User HID and ShieldLabs links it to the devices, visitors and public and local IPs it uses, and detects Multi-accounting and Account takeover on it. A naive checkout trusts the cookie, the session or the buyer’s IP, and all three are trivial to reset. The Device ID holds through cleared cookies, incognito mode and IP changes, so a buyer who clears cookies or rotates to a fresh proxy IP between attempts still resolves to the same device. Underneath, the payment step itself is one identification: a Risk Score from 0 to 100 with every risk signal named and weighted, so a VPN, proxy, Tor, browser automation or an anti-detect browser on the paying session shows up by name.ShieldLabs stops payment fraud before the charge: it returns the Risk Score and every named risk signal on the payment step and detects High-Risk Events on the buyer’s account. You choose the action for each case: charge, step up to 3-D Secure or a one-time code, or hold for review.
Read the buyer’s account and the fresh Risk Score the moment the buyer reaches the payment step. The rule: charge when the payment step is Trusted and the account’s history is clean; step up when the payment step is Suspicious, when the device is new to an established account, or when risk signals such as Tor, Anti-detect Browser, Browser Automation or Abuser Flag fire; hold for review when the payment step or the account’s history is Dangerous, or when you marked the account after an Account takeover event reached you through the API, webhooks or the analytics dashboard. A buyer behind a fresh proxy IP or cleared cookies still resolves to the same device and the same account.
Start Free with 5,000 identifications, one time, no credit card, or log in. In the analytics dashboard, add the domain you want to protect under Integration > Domains, then open Integration > API keys and copy its keys with the copy button next to each. The Public Key loads the snippet in the browser. Keep the server credentials on your backend: the Private API Key reads the History API, and each webhook endpoint has its own whsec_… signing secret. See API keys and Integration.
2
Force a fresh check at the payment step
On signed-in pages you already pass the hashed User HID with checkAuthenticatedUser. At the payment step you want a current read, so call forceCheckAuthenticatedUser: it runs an identification every time, keeps the current Session ID and restarts the five-minute window. A plain checkAuthenticatedUser runs at most one identification every five minutes for the same user within one visit, so a call right after another page’s check in the same visit would post nothing and the payment would reach your backend with no request ID. Pass a hashed or pseudonymous user id, never a raw email or account id.
checkout.html
<script type="module"> const mod = await import( 'https://cdn.shieldlabs.ai/snippet.js?publicKey=YOUR_PUBLIC_KEY' ); // The browser does NOT compute the Risk Score. Keep result.requestID: // join key to the webhook. mod.forceCheckAuthenticatedUser('a1b2c3d4hasheduserid', { onInitialized: (result) => { if (result.status !== 'initialized') return; document.getElementById('shieldlabs-request-id').value = result.requestID; }, });</script><form id="checkout-form" method="POST" action="/api/checkout"> <input type="hidden" id="shieldlabs-request-id" name="shieldlabsRequestId" /> <!-- payment fields --> <button type="submit">Pay</button></form>
The snippet POSTs the signals to rest.shieldlabs.ai automatically; installing the snippet covers the framework versions of the same dynamic-import pattern. For a guest checkout with no account, call forceCheckAnonymous instead; the handler below then skips the account binding and the account read. Card Testing covers guest checkouts in depth.
3
Read the buyer's account
The payment is one identification. The buyer’s account has a history. The shared accountView helper from the Use Case Tutorials reads the account’s identifications from the History API by user_hid, and its worst band shows how risky the account has been. To tell whether this payment comes from a device the account has used before, compare its Device ID with the devices on which the account completed a verified action, the trust list from Returning Visitor Recognition, rather than with every device in the account’s history: a taken-over session that browsed signed-in pages before paying already has identifications from its new device under this User HID. Pass a hashed User HID with checkAuthenticatedUser on every signed-in page. Users, account-level risk and all four High-Risk Events are built on it.
Read the buyer's account
// Inside /api/checkout, once you have `risk` for this payment.// accountView reads the account's newest 100 identifications by user_hid,// without this payment and without the 999 rate-limit marker.// account.worstBand: 'Dangerous' means the account has been risky before,// whatever this payment scores (null when it has no earlier identifications).// accountView throws when the History read fails; the full handler below// routes that payment to review.const account = await accountView(userHid, { excludeRequestId: risk.request_id });// A device new to an established account: the account completed verified actions// on other devices, not on this one. trustedDevices is your own store, filled by// rememberTrustedDevice (Returning Visitor Recognition) after a verified action.const knownDevices = await trustedDevices.list(userId); // a Set of Device IDsconst newDevice = knownDevices.size > 0 && !knownDevices.has(risk.device_id);
A Dangerous history, or a payment from a device that is new to an established account, is the account-level shape of a taken-over account or a stolen card. History reads never count against your included identifications.Open the buyer’s user card in the analytics dashboard to see its band for the period, its High-Risk Events and each linked device, visitor and IP with the band of the identifications it shares with the account.
4
Receive the webhook and gate the charge
ShieldLabs POSTs one webhook per identification. Verify X-Shield-Signature on the raw body, then cache the result keyed by request_id so the checkout request can look it up. The shared waitForScore helper (defined once for every tutorial) does this read, polling the cache and falling back to the History API by request_id. Delivery is at-most-once with no retries, so the History fallback covers a dropped webhook. History reads and webhook delivery never count against your included identifications.Branch on the Risk Score of the payment and its band, which already fold in the risk signals, and on the account’s history. At the payment step, draw the band lines tighter than elsewhere.
checkout.js
app.post('/api/checkout', async (req, res) => { const { shieldlabsRequestId, paymentData, userId } = req.body; // The same hashing you apply before passing the id to the snippet; null for a guest checkout. const userHid = userId ? hashAccountId(userId) : null; // Wait up to ~2s for the webhook; falls back to the History API. const risk = await waitForScore(shieldlabsRequestId, 2000); // No identification for this payment: hold rather than charge on missing data. if (!risk) { return res.status(202).json({ status: 'review', reason: 'no_identification' }); } // A signed-in buyer's identification must be theirs. Guests send "anonymous". if (userHid && risk.user_hid !== userHid) { return res.status(202).json({ status: 'review', reason: 'identification_mismatch' }); } // The 999 rate-limit marker, or no usable Device ID: hold for review. if (risk.risk_score > 100 || !risk.device_id || risk.device_id === NIL_DEVICE) { return res.status(202).json({ status: 'review', reason: 'unverified_device' }); } const score = risk.risk_score; const flags = risk.detection_flags ?? {}; // used by the hard rules below // The buyer's account, without this payment, and its trusted devices (previous step). // A guest checkout has neither. A failed History read is unverified: hold for review. let account = null; if (userHid) { try { account = await accountView(userHid, { excludeRequestId: risk.request_id }); } catch { return res.status(202).json({ status: 'review', reason: 'history_unavailable' }); } } const knownDevices = userHid ? await trustedDevices.list(userId) : new Set(); const newDevice = knownDevices.size > 0 && !knownDevices.has(risk.device_id); // Accounts you marked after a High-Risk Event reached you through the API, // webhooks or the analytics dashboard. const marked = userHid ? await markedAccounts.has(userHid) : false; // your own store // Dangerous payment, a Dangerous history or a marked account: hold for review. if (score >= 60 || account?.worstBand === 'Dangerous' || marked) { await flagForReview(userId, risk); return res.status(202).json({ status: 'review', reason: 'dangerous_or_marked' }); } // Suspicious payment, or a device new to an established account: step up. if (score >= 30 || newDevice) { return res.status(202).json({ status: 'step_up', method: '3ds' }); } // Trusted payment on a device from the account's trust list (or a trust list that is // still empty): charge in your own flow. After a successful charge, add the device // with rememberTrustedDevice(userId, risk). return processPayment(paymentData, userId, res);});
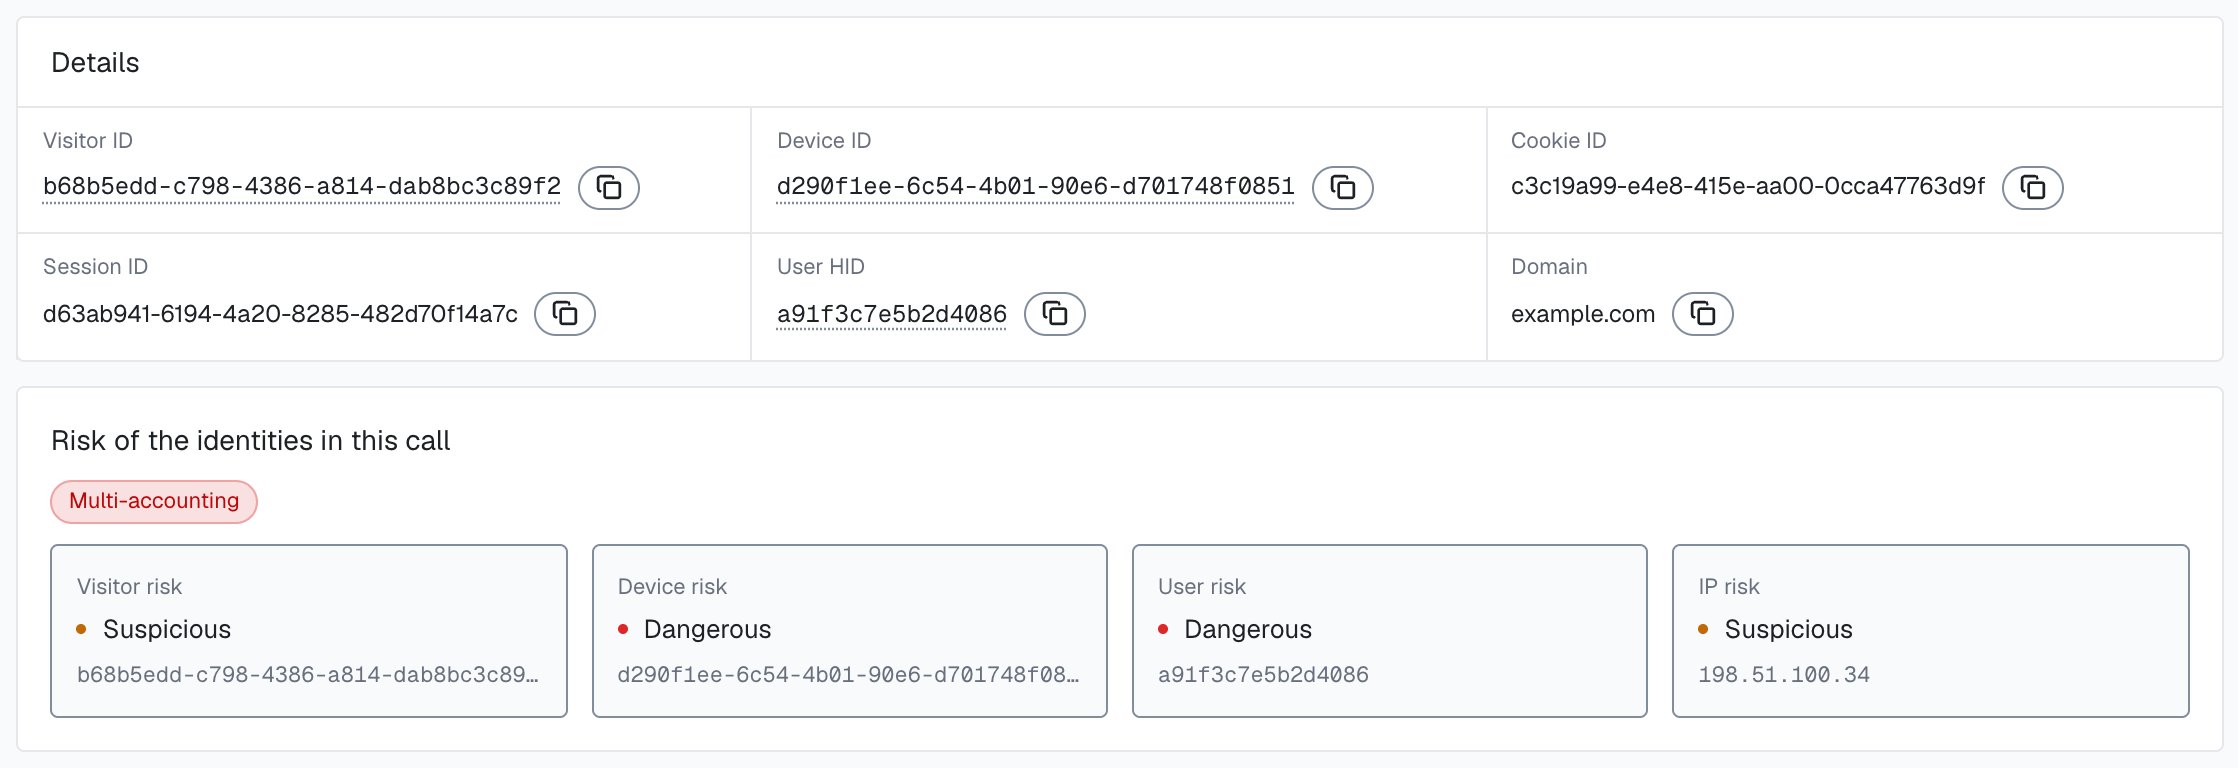
NIL_DEVICE is the all-zero Device ID (00000000-0000-0000-0000-000000000000), exported by the shared helpers. An all-zero Device ID means no usable device signals reached ShieldLabs for that identification; the rate-limit marker (Risk Score 999) is one such case. Route it to review rather than allowing it, as the guard above does.ShieldLabs returns a Risk Score and every named risk signal on each identification, and detects High-Risk Events on your users. You choose the action for each case (charge, step up, review or block) and act on the result in your backend.In the analytics dashboard, the payment’s identification card shows its risk signals with their weights next to the risk of the account, device, visitor and IP behind it.
One identification and the risk of the user, device, visitor and IP it belongs to, in the analytics dashboard.
5
Compare the countries behind a VPN
For a stolen-card buyer who hides their location, compare the two countries. The webhook carries two IP objects. public_ip is the public address and its country, which a VPN or proxy can put anywhere. local_ip is the Local IP: the address the browser itself reports, which can differ from the public IP behind a VPN or proxy and can expose the network behind the mask. local_ip.ip is empty when the Local IP was not captured. detection_flags.ip_mismatch is true whenever the two are different addresses. It is informational, adds nothing to the Risk Score and can be ordinary on mobile networks, so compare local_ip.country with public_ip.country rather than branching on the flag alone. A buyer whose public IP says one country while the Local IP sits in another is pretending to shop from somewhere else.
// Inside your /api/checkout handler, after the guard.const publicCountry = risk.public_ip?.country;const localCountry = risk.local_ip?.country; // empty when not captured; null on the History fallbackif (localCountry && publicCountry && localCountry !== publicCountry) { return res.status(202).json({ status: 'step_up', method: '3ds' });}
When the Local IP was not captured, the stun_not_checked risk signal can show that the network check did not complete, so you do not silently lose the comparison.For a hard rule that does not depend on the band, branch on the detection_flags object: its keys (vpn, tor, proxy, datacenter_ip, abuser, os_mismatch, anti_detect_browser, browser_automation, …) are stable booleans. Webhook signals[].name is a slug (antidetect_browser), not a display label.
// `flags` from the guard: detection_flags on the webhook and on the History fallback.if (flags.tor || flags.abuser || flags.browser_automation) { // Always step up, regardless of the numeric band. return res.status(202).json({ status: 'step_up', method: '3ds' });}
6
Re-check on later sensitive actions
For a high-value order or a follow-up withdrawal, run another forceCheckAuthenticatedUser at that moment. Each sensitive action deserves its own fresh identification rather than a reused Risk Score.
The three bands and their ranges are defined in Risk Scoring; the full action playbook is in Acting on results. The payment step is a good place to draw the same band tighter than you would elsewhere:
Band
At a low-stakes page
At checkout
Trusted (0-29)
Pass through
Allow, charge, log the signals
Suspicious (30-59)
Second look
Step up to 3DS or OTP before the charge
Dangerous (60-100)
Review or challenge
Hold for review or require verification
The Risk Score already folds in the risk signals, so you branch on the Risk Score and its band rather than on individual entries. Each entry in signals carries a stable slug in name and its weight; the table gives the slug and the label. The risk signals reference lists the full set with weights.
Risk signal (signals[].name)
Label
Weight
Why it matters at payment
tor
Tor
99
Connection exits through the Tor network. Rare for legitimate buyers. Usually a hard challenge or block.
browser_automation
Browser Automation
60
The browser is driven by an automation framework: a bot at checkout, common in card testing.
antidetect_browser
Anti-detect Browser
60
Fingerprint-spoofing indicators. Common in coordinated payment abuse.
os_mismatch
OS Mismatch
60
The OS the browser claims does not match other evidence. A spoofing indicator.
proxy
Proxy
10
IP flagged as a proxy. One signal among several; weigh it with the rest.
datacenter_ip
Datacenter IP
10
IP is in a hosting range. Unusual for a real shopper on a personal device.
abuser
Abuser Flag
10
The IP appears on an abuse reputation list. Corroborating on its own.
Branch on detection_flags keys, which match the slugs except for one entry: the flag for Anti-detect Browser is anti_detect_browser. Proxy, Datacenter IP, and Abuser Flag are each low weight and stack: a buyer on a flagged datacenter proxy with abuser reputation reaches the Suspicious band from these three together, where any one alone would not. Tor, JavaScript Disabled, OS Mismatch, Anti-detect Browser and Browser Automation are the high-weight single signals that push straight into Dangerous.
Read a high Risk Score together with its named risk signals and the user’s history. A real customer on a corporate VPN can reach the Suspicious band; the signals show why, and you choose the action for each case. Corporate VPNs, privacy browsers and iCloud Private Relay all raise the Risk Score for real customers, so decide on the Risk Score, the signals, the account’s history and the action context together, and tune your cutoffs gradually. A vpn or privacy_relay signal alone is weaker evidence than tor, antidetect_browser or browser_automation.
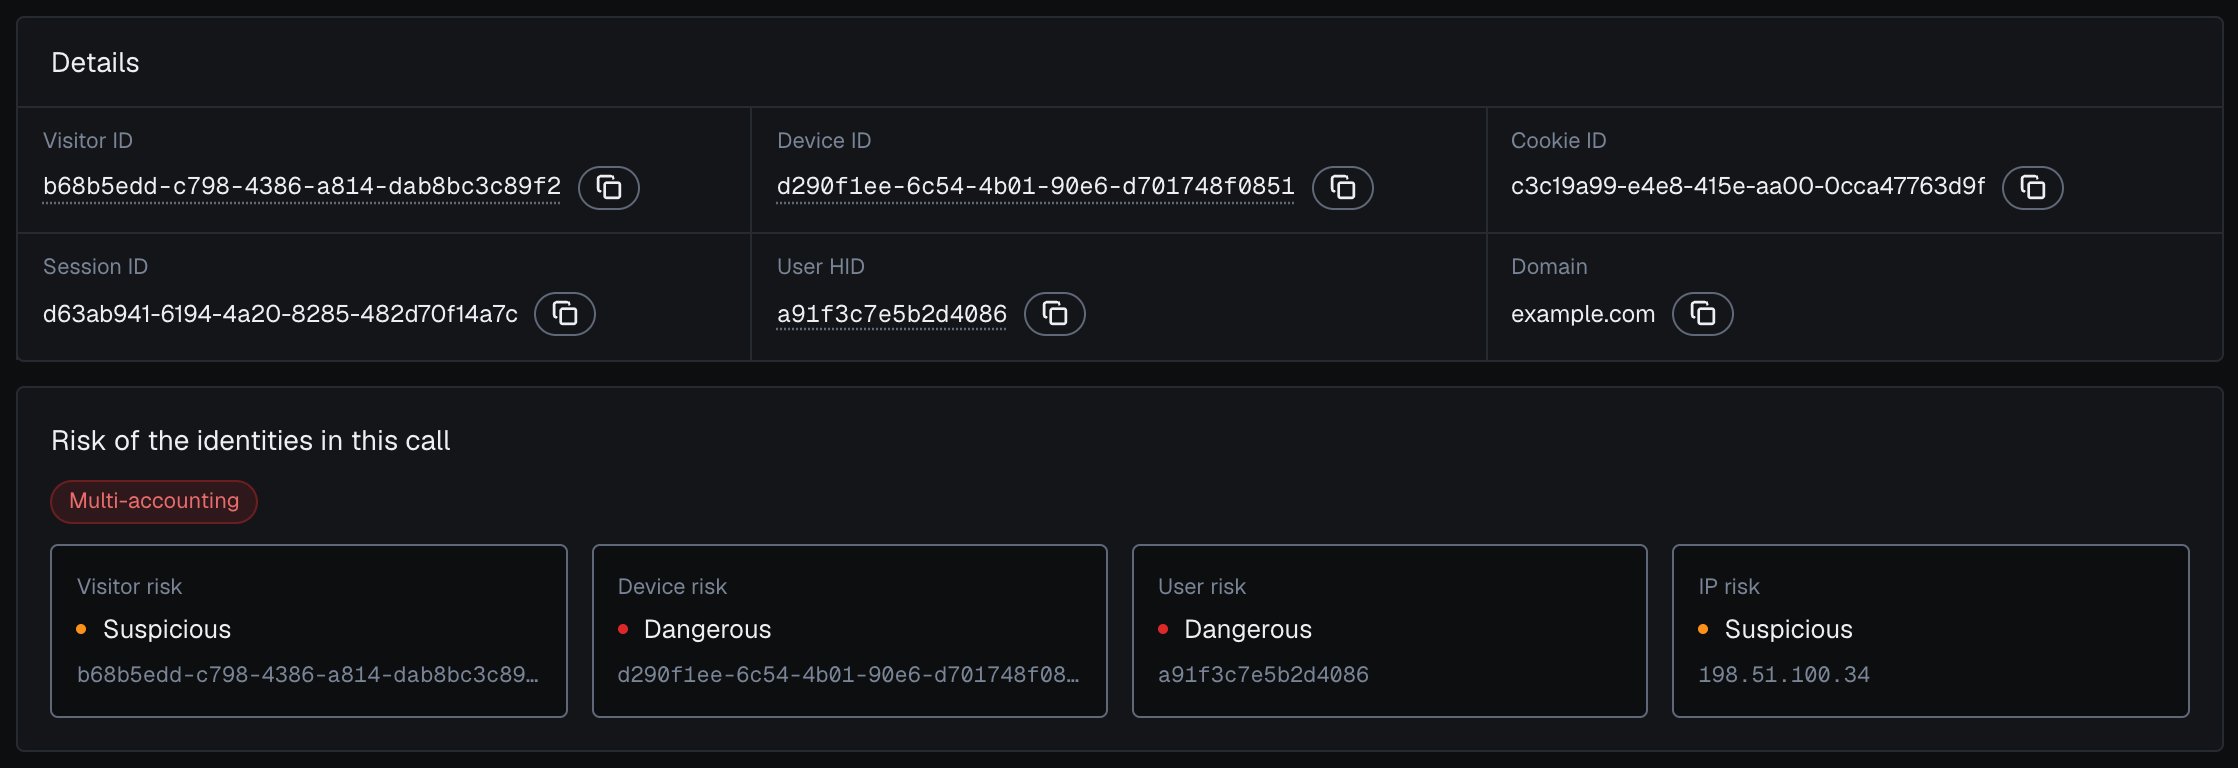
ShieldLabs detects Multi-accounting and Account takeover on your users directly. Multi-accounting: several accounts run by one person, linked through the devices and network they share. Account takeover: an existing account appearing in a new environment that points to someone else using it. Each detection carries Medium or High confidence, depending on the combination of evidence, on its own axis next to the Risk Score, so an account can be Trusted on every identification and still carry an event. High-Risk Events are available in the analytics dashboard, the API and webhooks, and need the hashed User HID you pass with checkAuthenticatedUser. The Risk Score and risk signals of the identification remain the input at checkout. When a High-Risk Event arrives for a buyer through the API or webhooks, or when you review it in the analytics dashboard, act on the account. You choose the action for each case, for example marking the account in your own system so its next payment steps up or goes to review, as the marked check above does. Acting on results gives a starting point for each event.
An account with an Account takeover event in the analytics dashboard.
Confirm the Device ID holds before you wire your cutoffs to live charges. Run a checkout, note the device_id from the webhook, then repeat it in an incognito window and after clearing cookies: the cookie_id and visitor_id change each time, but the device_id stays the same, which links one buyer across “fresh” sessions. A second browser on the same machine is a new Device ID; the User HID ties that checkout to the same account. To see the Risk Score react, repeat the checkout through a VPN or proxy and watch signals gain a vpn or proxy entry.Then open the buyer’s user card in the analytics dashboard: Linked devices lists both browsers, each with the band of the buyer’s identifications on it.